
Use Of The GS-0007_Rev. A Breech Pin Remove/Install Toolset
The photographs in this tutorial were taken in my shop with a well-used GS-0007 and it is shown set up to remove breech pins. This tool should be used with blocks that are either riveted into their receiver or placed inside a receiver without riveting. At one time the tool can with a pair of shims to mimic the receiver thickness but they caused some confusion and were eliminated. Note – it matters not whether rivet heads are present.
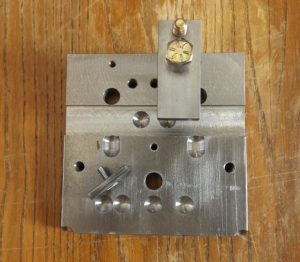
Here we see the toolset complete with the clamping strap and the support ledge. The support ledge is machined to two (02) different thicknesses to accommodate different rifle designs. This tool allows one to align the breech pin (hole) and clamp the assembly to the plate so it does not move around.
It is a work practice that these pins are pressed in from the right-hand (charging handle) side and pressed out from the left-hand (optic rail) side.
Removal Of The AKM/AK74 Breech Pin
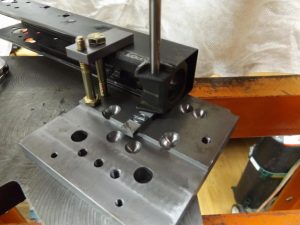
Notice how I have selected which end of the support ledge to use and have and screwed it tightly in position. The clamp is set in place and is level Merely turn over the plate and verify that the breech pin (hole) is aligned and tighten the clamp. Apply downward force to the pin and press it out. Note – milled receiver rifles use this same position on the plate but do not need the support ledge.
Removal Of The M1964 RPK Breech Pin (PSL Is Similar)
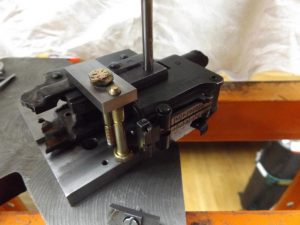
Notice that I am now using the trough and stepped areas of the plate for the bulged receiver. I have selected which end of the support ledge to use and have and screwed it tightly in position. The clamp is set in place and is level Merely turn over the plate and verify that the breech pin (hole) is aligned and tighten the clamp. Apply downward force to the pin and press it out.

Removal Of Zastava Breech Pin
Notice that I am now using the trough and stepped areas of the plate for the bulged receiver. I have selected which end of the support ledge to use and have and screwed it tightly in position. The clamp is set in place and is level Merely turn over the plate and verify that the breech pin (hole) is aligned and tighten the clamp. Apply downward force to the pin and press it out. Notice that this is a torched receiver section that still contains rivets.
And that’s it! Insertion is done by flipping the receiver assembly over and installing the pin from the right-hand (charging handle) side.
You may find that the support ledge is not thick enough for a few blocks. If this is the case just cut small pieces of paper strip and build up under the ledge.